Extend network access beyond overlay hosts
This guide explains how to configure Nebula to route traffic destined for a specific subnet through a specific overlay
network host using Nebula's unsafe_routes feature.
This is especially useful for accessing hosts that cannot be modified to run Nebula, such as printers, physical access control systems, and other proprietary devices on which you cannot install arbitrary software.
Prerequisites
Read the Quick Start guide to learn how to create your first overlay network.
You'll need the following to complete this guide.
- A working overlay network with a lighthouse and at least two hosts:
- Linux host that will act as the router between the overlay network and local network
- Linux, macOS, or Windows host that wants to access the local network via an overlay network connection to the "Linux router" host
nebula-certbinary to sign host certificates- The ca.key and ca.crt files for the working overlay network
- Root access to a Linux host on the network that will route traffic using
unsafe_routes - Root access to a Linux, macOS, or Windows host on a different network than the Linux host that will route traffic.
This guide assumes that you have the directory for the
nebulaandnebula-certbinaries in your$PATH.
You will also need to confirm that your CA is able to sign host certificates with the metadata required to route traffic
using unsafe_routes. If you didn't specify -subnets when creating your CA you're good to go. To confirm, run the
following from the directory containing your CA cert.
nebula-cert print -path ca.crt
If Subnets is an empty set or if it contains the CIDR that you want to access, you are good to go.
Here's an example of a CA generated without specifying any subnets.
Tip: Add a -json flag to the nebula-cert print command and pipe the output to jq.
nebula-cert print -json -path ca.crt | jq .details
{
  "groups": [],
  "ips": [],
  "isCa": true,
  "issuer": "",
  "name": "BK Labs",
  "notAfter": "2022-12-02T19:21:05-05:00",
  "notBefore": "2021-12-02T19:21:05-05:00",
  "publicKey": "50dd6fb1d2c02f17ddfeb017fe1bf16cf69d42ec28e8a2e02fde5ad2f944f136",
  "subnets": []
}
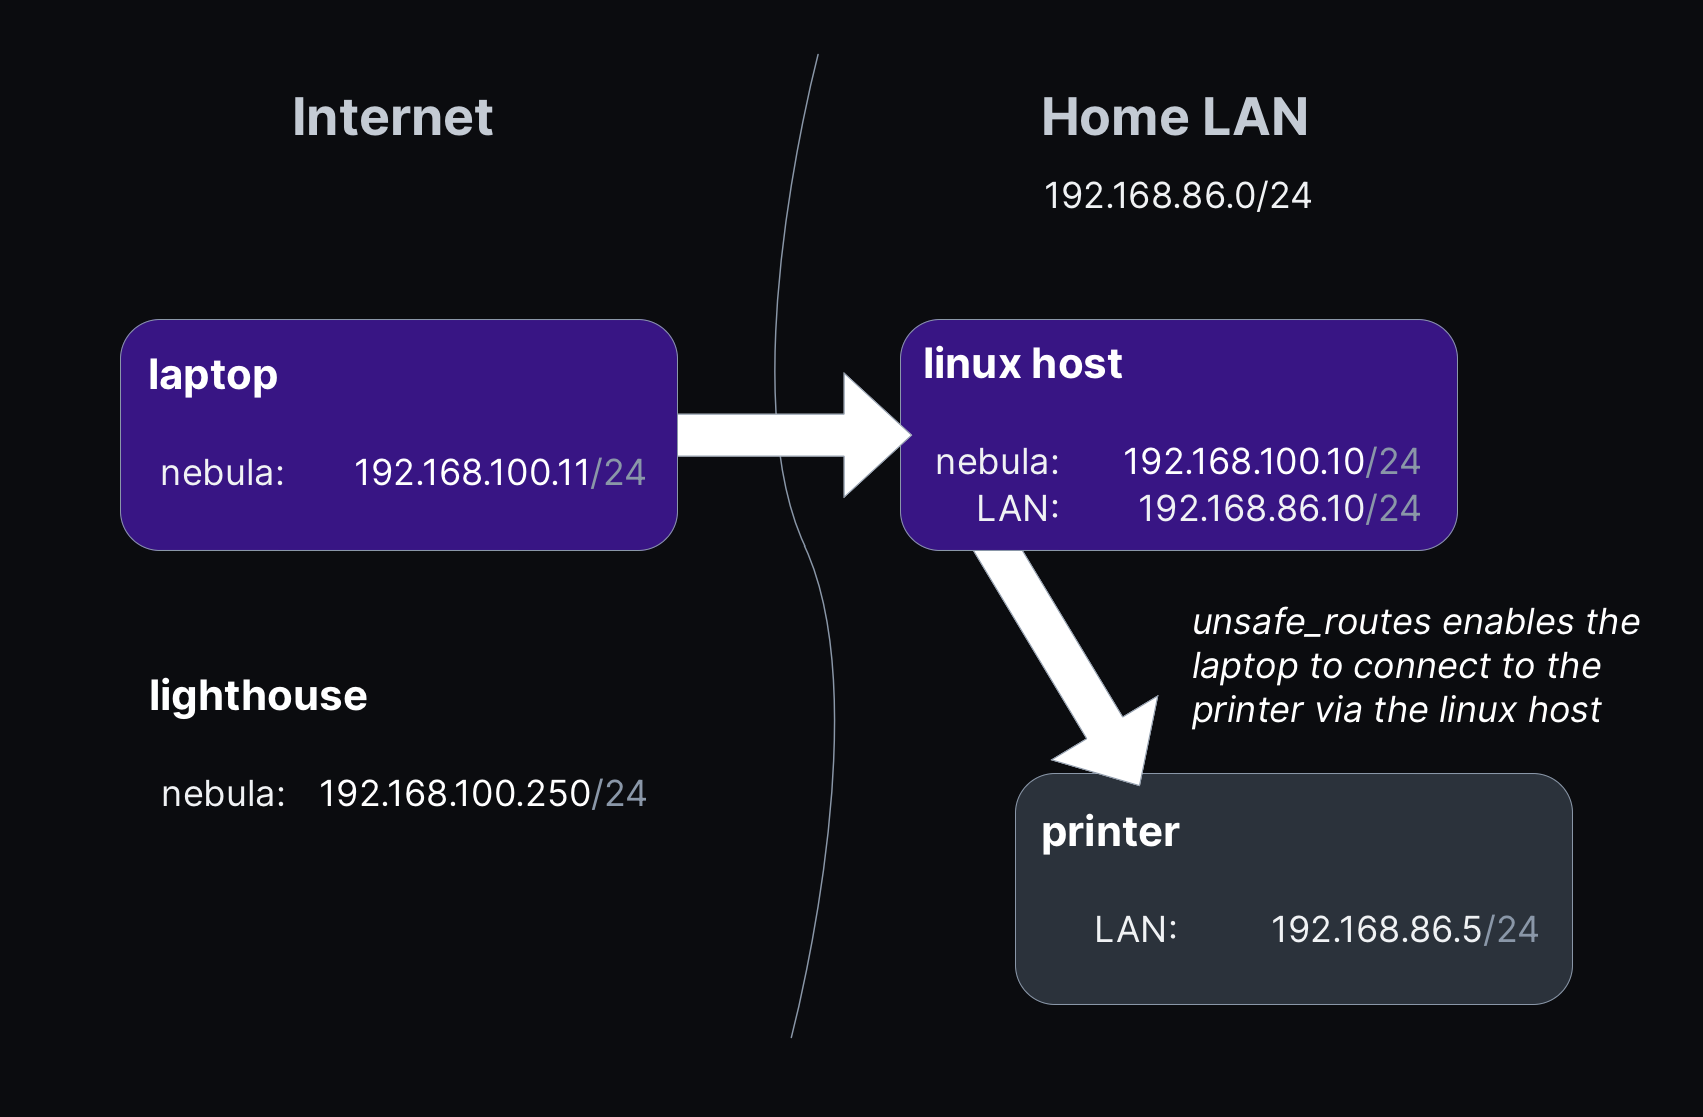
Example Network
The following IP addresses, hostnames, and subnets are used throughout this guide to illustate a valid configuration for our use case.
Home network (LAN)
This is the subnet that we want to be able to access remotely over our Nebula overlay.
192.168.86.0/24(192.168.86.1–192.168.86.254)- The Linux host routing traffic from Nebula using
unsafe_routesis connected to this network
| LAN Host IP | LAN Hostname | Overlay Hostname | Description |
|---|---|---|---|
192.168.86.10 | raspi.lan | home-raspi | Linux host on LAN that will handle routing |
192.168.86.5 | printer.lan | (none) | Printer that cannot run Nebula |
Overlay network (Nebula)
This is the overlay network that will be used by hosts running Nebula.
192.168.100.0/24(192.168.100.1–192.168.100.254)- The macOS host in this example has Internet access but it not on the same, physical LAN as the Linux host.
| Overlay Host IP | Overlay Hostname | Description |
|---|---|---|
192.168.100.10 | home-raspi | Linux host that will route traffic between LAN and overlay |
192.168.100.11 | laptop-mac | Mac that will access printer via home-raspi |
Configuration Steps
Using the example network and hosts referenced above, the following steps explain how to configure the macOS host
(laptop-mac, 192.168.100.11) to route traffic through the Linux host (home-raspi, 192.168.100.10) in order to
reach home printer from anywhere.
Step 1. Sign cert with subnets you want to route
From the same directory containing our CA cert (ca.crt) and key (ca.key), run the following command to sign a new cert for our Linux host that will be routing traffic to the home network.
nebula-cert sign -name 'home-raspi' -ip '192.168.100.10/24' -subnets '192.168.86.0/24'
Inspect the new certificate to confirm that subnets is now correctly set to the Home LAN CIDR.
nebula-cert print -json -path home-raspi.crt | jq .details
{
  "groups": [],
  "ips": [
    "192.168.100.10/24"
  ],
  "isCa": false,
  "issuer": "57903a07e52a8f5464636aeccb1942560324dcd1f6c4f0457d77b00372b5d9f2",
  "name": "home-raspi",
  "notAfter": "2022-12-02T19:21:04-05:00",
  "notBefore": "2021-12-03T11:19:38-05:00",
  "publicKey": "defd2478b4818659d21d862a7dc51a6630fce8fc1fafdec1026c6552f01c0655",
  "subnets": [
    "192.168.86.0/24"
  ]
}
Step 2. Copy cert to Linux host (LAN)
Next, copy the new host certificate and key over to the Linux host that will handle the routing.
scp home-raspi.crt home-raspi.key root@raspi.lan:/etc/nebula
After copying these files, login to this host and replace your existing key and cert with these files. This is commonly
/etc/nebula. It's also a best practice to make sure that the key file is only readable by root. If you keep the same
file paths as the old key and cert you won't need to make any changes to your Nebula config.yml file.
Step 3. Configure Nebula firewall on Linux host (LAN)
In addition to adding a CIDR to the subnets field of our new cert, you also need to add inbound firewall rules to the
Linux host in this example for any port that you want to access through this host.
For example, if you want to access a printer on the LAN, you will need to add a rule to allow TCP port 631. Edit the
Linux host's Nebula configuration file (commonly located at /etc/nebula/config.yml).
firewall:
  inbound:
    - port: 631
      host: any
      proto: tcp
You may need to add additional ports depending on your printer. The easiest way to make sure you can fully access any
host on your network is to add a rule to allow any port/protocol on this host. The entire firewall section should look
like the following.
firewall:
  inbound:
    - port: any
      host: any
      proto: any
  outbound:
    - host: any
      port: any
      proto: any
At this point we're finished configuring the Nebula-specific components on our Linux host. If Nebula is already running, go ahead and stop it. It's a good idea to start it again to validate that the configuration file, cert, and key are set up properly.
sudo nebula -config /etc/nebula/config.yml
INFO[0000] Firewall rule added              firewallRule="map[caName: caSha: direction:outgoing endPort:0 groups:[] host:any ip: proto:0 startPort:0]"
INFO[0000] Firewall rule added              firewallRule="map[caName: caSha: direction:incoming endPort:0 groups:[] host:any ip: proto:0 startPort:0]"
INFO[0000] Firewall started                 firewallHash=21716b47a7a140e448077fe66c31b4b42f232e996818d7dd1c6c4991e066dbdb
INFO[0000] Main HostMap created             network=192.168.100.10/24 preferredRanges="[]"
INFO[0000] UDP hole punching enabled
INFO[0000] Nebula interface is active       build=1.5.0 interface=nebula network=192.168.100.10/24 udpAddr="[::]:43068"
If you see a Handshake message sent to your lighthouse followed by a corresponding received message after a similar
set of lines shown above you are good to go.
You can either leave Nebula running in the background or stop it while completing the next steps specific to this host.
Step 4. Enable IP forwarding on Linux host (LAN)
Linux hosts need a kernel parameter set in order to allow packet forwarding. This is not typically enabled by default as shown in the following read example.
sysctl net.ipv4.ip_forward
net.ipv4.ip_forward = 0
Here's how you update that variable at runtime.
sudo sysctl -w net.ipv4.ip_forward=1
net.ipv4.ip_forward = 1
Note: This change is only persistent until you reboot. To make it permanent, add a new line with
net.ipv4.ip_forward = 1 to the end of the /etc/sysctl.conf file.
Step 5. Configure packet routing on Linux host (LAN)
Packet routing on Linux can be done using iptables or the newer nftables. On most distributions iptables is using the nftables backend already.
nftalbes is preffered because it's new and designed to keep configurations in files.
Both iptables and nftables are also used to implement Linux firewall so be careful when making changes so you don't break your firewall, lock yourself outside your server or introduce vulnerabilities.
5.a Packet routing using nftables
- Create a nftables file that we will name
nebula-routing.confwith the contents bellow - Load the configuration
- Test the configuration works as expected
- Load the configuration at boot (see https://wiki.nftables.org/wiki-nftables/index.php/Quick_reference-nftables_in_10_minutes#Load_ruleset )
nebula-routing.conf
table ip nebula_routing {
	chain nat {
		type nat hook postrouting priority srcnat; policy accept;
		ip saddr 192.168.100.0/24 ip daddr 192.168.86.0/24 counter masquerade
	}
	chain forward {
		type filter hook forward priority filter; policy accept;
		ip saddr 192.168.100.0/24 ip daddr 192.168.86.0/24 counter accept
		ct state related,established counter accept
	}
}
Usefull nftables commands are listed bellow.
# List current nftables rules
sudo nft list ruleset

# Load nebula rourting configuration
sudo nft --file nebula-routing.conf

# Remove all nftables configuration
sudo nft flush ruleset
5.b Packet routing using iptables
Now that IP forwarding is enabled, we need to add a few iptables rules so that our Linux host running Nebula will be
able to act as a NAT and masquerade as the other Nebula nodes that are using unsafe_routes to connect through the
Linux host to any host on the local LAN.
Run the following commands to add the rules specific to our example networks.
sudo iptables -t nat -A POSTROUTING -s 192.168.100.0/24 -d 192.168.86.0/24 -j MASQUERADE
sudo iptables -I FORWARD 1 -s 192.168.100.0/24 -d 192.168.86.0/24 -j ACCEPT
sudo iptables -A FORWARD -m conntrack --ctstate RELATED,ESTABLISHED -j ACCEPT
Once complete, you can confirm that the new rules are active by running the following.
This first list shows the second and third rule.
sudo iptables -L
Chain INPUT (policy ACCEPT)
target     prot opt source               destination

Chain FORWARD (policy ACCEPT)
target     prot opt source               destination
ACCEPT     all  --  192.168.100.0/24     192.168.86.0/24
ACCEPT     all  --  anywhere             anywhere             ctstate RELATED,ESTABLISHED

Chain OUTPUT (policy ACCEPT)
target     prot opt source               destination
And this command shows the first rule, specific to the NAT table.
sudo iptables -t nat -L
Chain PREROUTING (policy ACCEPT)
target     prot opt source               destination

Chain INPUT (policy ACCEPT)
target     prot opt source               destination

Chain POSTROUTING (policy ACCEPT)
target     prot opt source               destination
MASQUERADE  all  --  192.168.100.0/24     192.168.86.0/24

Chain OUTPUT (policy ACCEPT)
target     prot opt source               destination
You may see additional rules listed depending on your host and whether or not you've modified it.
Note: These rules will only be persistent until you reboot the host. Depending on your distribution, you need to run additional commands to save these rules to disk and load them at boot.
Step 6. Edit Nebula config on the overlay hosts that need to access the home LAN
We're almost there!
The final step in this process is to configure the overlay network hosts to use unsafe_routes and route traffic
destined for our home LAN through the Linux host that we just configured.
Keeping with the example Overlay network in this guide, we will add the unsafe_routes
details to the tun section of the Nebula config.yml file on laptop-mac.
tun:
  dev: utun10
  drop_local_broadcast: true
  drop_multicast: true
  mtu: 1300
  unsafe_routes:
    - route: 192.168.86.0/24
      via: 192.168.100.10
Run Nebula with the new configuration:
sudo nebula -config config.yml
INFO[0000] Firewall rule added           firewallRule="map[caName: caSha: direction:outgoing endPort:0 groups:[] host:any ip: proto:0 startPort:0]"
INFO[0000] Firewall rule added           firewallRule="map[caName: caSha: direction:incoming endPort:0 groups:[] host:any ip: proto:1 startPort:0]"
INFO[0000] Firewall started              firewallHash=570dd0546e17b139da845c05717d6dc2005fa7083292e1e8f797affab434c4f4
WARN[0000] Adding UNSAFE Route           route=192.168.86.0/24 via=192.168.100.10
INFO[0000] Main HostMap created          network=192.168.100.11/24 preferredRanges="[]"
INFO[0000] UDP hole punching enabled
INFO[0000] Nebula interface is active    build=1.5.0 interface=utun10 network=192.168.100.11/24 udpAddr="[::]:57027"
You should see a WARN line above indicating that we have an UNSAFE route being used. And now... you should be able to
successfully ping any host on the 192.168.86.0/24 Home LAN.
Ping working? Great! Go ahead and add that printer, map file shares, and VNC to any host on that LAN.
Add the same unsafe_routes section to any other Nebula host that needs to access hosts on the Home LAN that aren't
running Nebula.
Tips
Avoid IP conflicts with underlay networks
When you are running Nebula with unsafe_routes the OS of the host will forward all traffic destined for the route
specified to Nebula. Keep in mind that this could cause a local IP conflict if your underlay network happens to use the
same subnet as the subnet specified in your unsafe_routes configuration.
Works with Mobile Nebula
After you've successfully completed the steps above, you can also access your extended networks from a device running Mobile Nebula on Android or iOS by launching the app and configuring it as follows:
- Tap the site you'd like to configure
- Then tap Configuration → Advanced → Unsafe routes
- Tap Add a new route and enter the same information you used in Step 6:
- Route:
192.168.86.0/24 - Via:
192.168.100.10
- Route:
- Tap Save

If already connected to the site, disconnect.
Connect and try to access one of the hosts only accessible using unsafe_routes. You should see a new line in your
Mobile Nebula logs.
level=warning msg="Adding UNSAFE Route" route=192.168.86.0/24 via=192.168.100.10